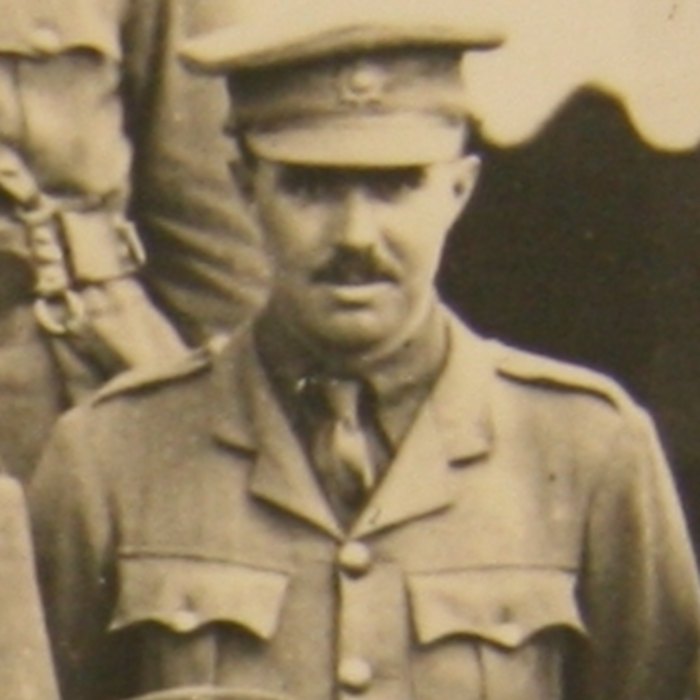
Captain Hudson
On the 21st August 1915, the 10th Battalion of the Hampshire Regiment took part in the August Offensive, the last major Allied offensive of the ill-fated Gallipoli Campaign. Allied landings on the Peninsula had begun on the 25th of April 1915 but had rapidly devolved into a stalemate both at Cape Helles and ANZAC Cove. In the four months from April to August, even the first day’s planned objectives had failed to be met.
A major surge on the 6th of August saw a new landing at Suvla Bay and renewed attacks at Cape Helles and ANZAC. Colonel Malone’s Wellington Battalion made progress and captured the peak of Chunuk Bair, though it was soon recaptured by a fierce Ottoman counterattack. The 10th Battalion of the Hampshire Regiment suffered significant casualties on the mountainside.
With the chance of retaking Chunuk Bair lost, the capture of the high ground inland from Suvla Bay became a priority. The 11th and 29th Divisions swept East from Suvla against Scimitar Hill, whilst a composite force including the 10th Hampshires was tasked with assaulting Hill 60 from the South.
At 5 am on the 21st August the commander of the 10th Battalion was briefed to screen the right flank of the advance. 85 guns, including the fire of six warships, were to provide gunfire support, although a shortage of shells and haze rendered the barrage ineffective.
Conducting a personal reconnaissance, Major Morley, commanding the Battalion, spotted men of the New Zealand Mounted Rifles (fighting as infantry during the campaign) in the Ottoman trenches and brought the 10th Battalion to reinforce the attack.
C Company, led by Captain Hudson, was the first to advance, traversing two gullies and an exposed ridgeline to reach the trench. A few men reached the front trench to reinforce the New Zealanders, but the majority of the men were cut down; A Company under Lt Calderwood followed but came under intense machine-gun fire. Lt Calderwood and many men were killed.
A and B Companies advanced with Captain Hellyer and Major Morley both being wounded, Hellyer mortally. The attack had failed and the New Zealanders’ hold in the Ottoman trenches was soon overrun.
After dark the survivors returned to Allied lines. In a letter home Captain Hudson wrote:
“The Battalion went in 350 strong including one Major, two Captains and two Lieutenants; the next morning we mustered one Captain (myself) one subaltern (the quartermaster) and 190 men. One Lieutenant was shot through the head within a yard of me and another Captain (married a week before leaving England) died of wounds and the Major was seriously wounded, leaving me in charge of the Battalion – such as it was”.
Captain Hudson was mentioned in despatches for his courageous actions during the attack and would continue to have a distinguished career with the Regiment. He won the Military Cross on the Western Front and commanded the 2nd Battalion at Dunkirk in 1940.
The attacks on Scimitar Hill and Hill 60 had both failed; the capture of two vital wells and the Western slope of Hill 60 was little consolation for the heavy casualties suffered. Large-scale attacks were halted as both sides were content to rest after such costly fighting. With the dominating high ground remaining in Ottoman hands, the Campaign was doomed to failure. The 10th Battalion would be withdrawn from Gallipoli in September and sent to Salonika in Greece, whilst the last British troops would be evacuated from the Peninsula in January 1916.
Chris Waters – Museum Assistant
On this day in 1917, 2nd Lieutenant Dennis GW Hewitt of the 14th Battalion of the Hampshire Regiment won the Victoria Cross.
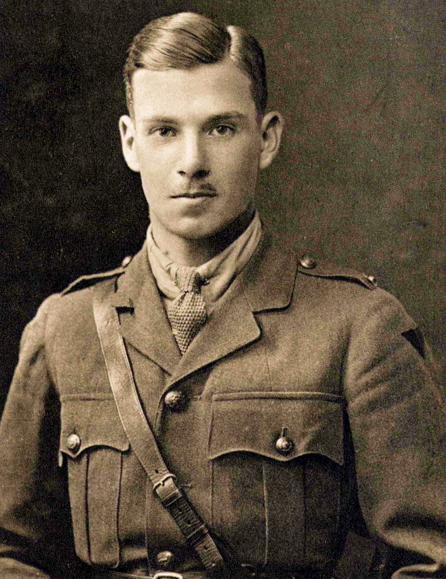
2nd Lieutenant Dennis GW Hewitt of the 14th Battalion of the Hampshire Regiment
The 31st of July 1917 marked the start of the Third Battle of Ypres, also known as the Battle of Passchendaele. The area was seen to offer the best chance for a decisive breakout as an advance from the Ypres salient could overrun the key railroad hub of Roeselare and even put German submarine bases on the Belgian coast under threat.
Ypres was surrounded to the north, east, and south by the Germans and was under constant observation and fire. The capture of Messines Ridge in June 1917 had removed the Germans from their most dominating positions in the south, enabling the build-up of the main offensive. Two weeks of bombardment (of more than 4.2 million shells) preceded the main attack on the 31st of July 1917.
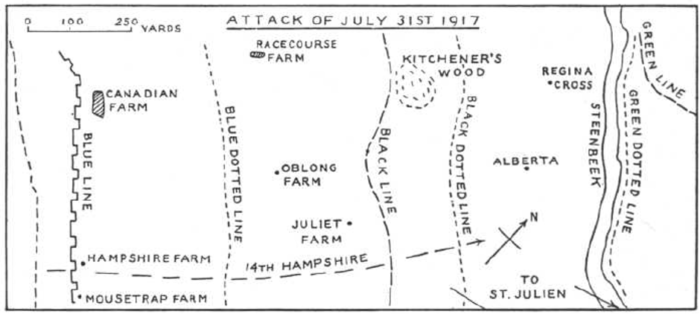
The 14th Battalion was part of the 39th Division, which was committed to the opening attack at 3:50 am on the 31st of July 1917. The 14th Battalion was held in reserve until the first line (blue – see map below) was taken by the 11th Royal Sussex. Leapfrogging the Sussex’s advance, the 14th Battalion took its first objective without much difficulty. The plan of attack was complex, with a creeping barrage preceding the advance by 90 meters, moving forward every 4 minutes.
19-year-old Second Lieutenant Dennis Hewitt was one of the men waiting for the barrage to advance; he had left his studies at Winchester College for Sandhurst in 1915 and had served with the 14th Battalion of the Hampshire Regiment in the later stages of the Battle of the Somme the previous year.
Hewitt was waiting for the barrage to lift when a piece of shrapnel struck his haversack, setting the signal lights inside alight. Hewitt managed to extinguish himself but had been badly burnt. Despite his injuries, Hewitt continued to lead his Company on to the next objective and through heavy machine-gun fire, ensured that the ‘Black dotted line’ was taken. Hewitt was leading the consolidation of the position when he was killed by a sniper. His leadership in the face of fierce opposition despite his severe wounds earned him the Victoria Cross.
The 14th Battalion continued to advance, reaching the green dotted line before 118 Brigade took over the attack on the final green line. 63 Officers and men of the Battalion were killed or missing and 161 wounded; however, the Battalion had achieved its objectives and captured more than 200 prisoners as well as 17 machine guns.
The attack on the 31st of July had proved to be a success with significant gains made across much of the Allied line. Unfortunately, heavy rain swept in, cutting off observation of the foremost troops; the Green Line was thus abandoned as artillery could not be directed against German counterattacks. With much of the churned-up battlefield reduced to mud by the rain, the offensive could not resume until the ground had dried out, giving the Germans time to reinforce the area.
The Third Battle of Ypres would continue to rage until November 1917, with a total of more than 500,000 casualties on both sides; no breakthrough would be achieved.

Pictured on white board are our newly conserved medals, each carefully attached by thread. On the black boards are medals still to be conserved as part of this project.
The museum is delighted to share that we were awarded a Museums Fundamental Grant from the fund of the Association of Independent Museums, the Julia Rausing trust and the Pilgrim Trust to work on our medal collection.
Part of our medal collection had been stored incorrectly in the past by being glued by their ribbons onto boards. This funding means we can pay for a specialist textile conservator to remove these medals safely and without damage from the storage boards, and the remainder of the grant is to purchase new racking, boxes and suitable packaging material to preserve and store them correctly in the future.
This is a fantastic project, and on completion we will be able to utilise all of our medals to show the stories of the regiment; change our displays more frequently and create an online exhibition with personal stories of the men and their awards. We will have completed the first phase by October, and aim to have the start of our ‘Men and Medals’ series arranged by Christmas, along with continuing the research work on the conserved medals.
We are very grateful to the funders for granting us the money for this project, and will be keeping our supporters up to date on the project as we progress.



Join the Great Summer Tiger Hunt at the Royal Hampshire Regiment Museum this summer.
Find the tigers in the museum and claim your free prize. Bigger tigers can earn an Army dog tag (suitable for age 3+) and smaller tigers get a brilliant medal sticker (suitable for all).
Entrance to the museum and participation in the trail is free. Find our all about the Hampshire tigers and our County Regiment in the heart of Winchester.
Find us on Southgate Street, Winchester. SO21 2RG. We are open Tuesday to Friday from 10.00am to 4.30pm and Saturdays from 10.30am – 3pm.
On this day in 1944, the 1st Battalion and the rest of 231 Brigade launched an attack on the town of Hottot in Normandy. Lieutenant Blackmore commanded 7 Platoon, A Company and detailed his platoon’s fight to clear its first objective during the battle. His account provides a snapshot of the challenges and nature of fighting in Normandy.
At 7:07 am, A Company of the 1st Battalion advanced south from Ferme De Braijere with No.8 Platoon on the left, assigned to clear a cornfield, whilst No.7 on the right was assigned to clear an orchard. No.9 Platoon was held in reserve and provided covering fire for the advance.
A hedgerow preceded the cornfield and Orchard, and it was here that the advance came under concentrated fire from a machine gun positioned to the south-east corner of the Orchard (marked MG1 on the map); it was quickly suppressed by the fire of No. 7 and No.8 platoons.
No.7 Platoon the began to advance up the left-hand side of the orchard when it was struck by several booby traps – these were remotely detonated by command wires that stretched back to German lines; miraculously, no casualties were sustained from the traps.
When the leading section of No.7 platoon reached the south-east corner where MG1 had been sited, three German machine guns in the south-west corner of the orchard and a section of German infantry dug in on the east side of the field opened fire.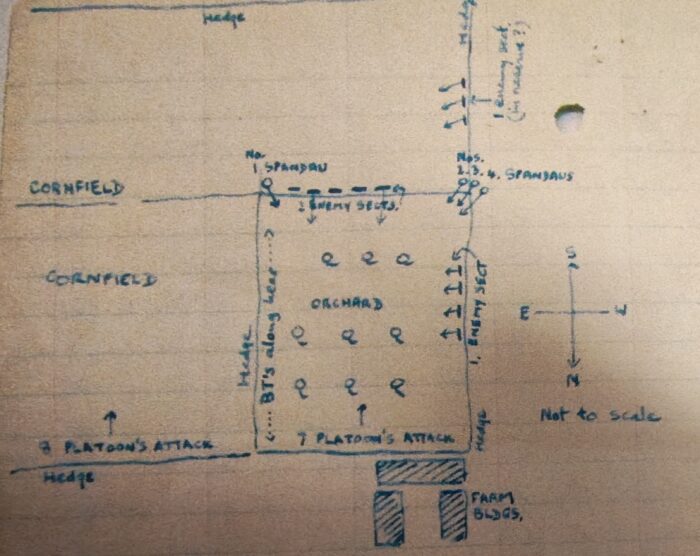
What could well have turned into a disaster was averted by the bravery of Private Robins, who single-handedly charged the machine gun position. Firing his Bren gun from the hip, Robins killed the German NCO commanding the MGs and pinned the surviving gunners down.
Robins’ actions allowed two sections to spring forward whilst the third suppressed the Germans on the east. The German positions were burnt out by No.77 phosphorus grenades and then stormed at the point of the bayonet.
In the first 15 minutes of the attack, No.7 Platoon had achieved its first objectives, suffering two men killed and one man wounded. 7 Germans had been killed and 13 captured. Private Robins won the Military Medal for his actions. The attack on the 11th of July saw the northern reaches of Hottot reached, but the 1st Battalion was ordered to withdraw due to German counterattacks. Hottot was not taken until the 18th of July when the Germans abandoned the town.
Booby traps, mines and prepared German defences and camouflaged machine gun nests would challenge the Allied advance in Normandy, where every hedgerow provided a ready defensive position. Only a slow, methodical advance could clear the hedgerows with the utmost courage required to press the attack home. Whilst the infantry made up 1/5th of the British Army’s strength in Normandy, they suffered 4/5ths of the casualties, with losses 80% above those projected.
Chris Waters – Museum Assistant
Images –
Right – not to scale map of the area
Main image – The area taken in 2009; the right corner of the hedgerow was where the three German machine guns were located.
The Battle of the Somme – 110 years onOn this day 110 years ago, the Battle of the Somme began. Preceded by 7 days of artillery bombardment, the British Army went over the top at 7:30 am on the 1st of July 1916 and suffered 60,000 casualties by the end of the day, equating to two casualties for every yard of the front attacked. The 1st Battalion of the Hampshire Regiment alone suffered 589 casualties in its attack in the Beaumont Hamel area, more than half the battalion.
Whilst the first day of the battle understandably dominates popular memory, fighting would continue until November, with more than a million casualties in total from just this battle. Despite disastrous casualties in the north on the 1st of July, British and French forces broke through the first German line in the south and the battle would continue from there.
The 1st, 2nd, 11th, 14th and 15th Battalions of the Hampshire Regiment would fight during the battle which would prove a trial by fire for the ‘New Army’ units raised from the enthusiastic volunteers of 1914 and 1915. Whilst the 11th, 14th and 15th Battalions all had experience of trench warfare since arriving in France; it would prove to be their first major offensive battle and despite heavy losses, the ‘New Army’ Battalions would acquit themselves well. The 15th Battalion famously served alongside the first tanks at Flers-Courcelette on the 15th of September 1916 and succeeded in taking its objectives.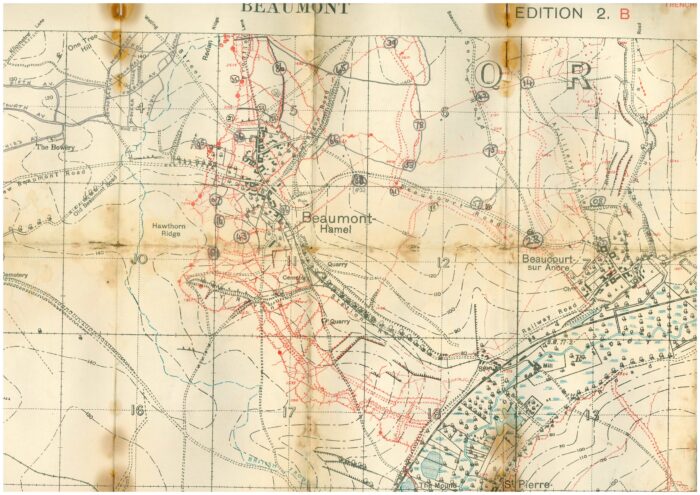
Throughout the battle, the British Army was gradually learning and evolving, incorporating new ideas and technology, though often at a heavy cost. It is worth remembering that the British Expeditionary Force deployed to France in 1914 consisted of just 150,000 men, whilst 2 years later, the British Army deployed 1.2 million men during the Battle of the Somme.
The Battle had a marked effect on the German Army, with one German officer describing the Somme as ‘the muddy grave of the German Army’. On the 11th of July, the German Army suspended its offensive against Verdun, giving the French Army much-needed respite, and after the battle, the Germans would withdraw 25 miles to the Hindenburg line, yielding more ground to the Allies than had been won since 1914.
Today we remember all those who were killed, injured or taken prisoner during the Battle.
Image (right) Trench map from later in the conflict (1916)
Cover image courtesy of the Imperial War Museum Q3978.
Chris Waters – Museum Assistant
Behaved with the greatest gallantry – commemorating Messines Ridge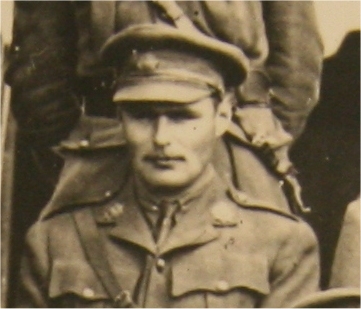
Second Lieutenant Francis John Whaley
On this day in 1917, the 15th Battalion took part in the capture of Messines Ridge in Belgium. Messines Ridge to the South of Ypres offered the Germans a clear view of the Allied lines in the Ypres salient and as the main British offensive of 1917 was planned to be launched from the salient in July, the capture of the ridge was vital.
The 9 attacking Divisions were supported by 2,230 guns firing a barrage of 3.5 million shells; also in support were the Royal Flying Corps and new and reliable Mk IV tanks. 19 mines dug under the German trenches were detonated simultaneously in the largest and deadliest man-made explosion until the use of the Atomic bomb.
The 15th Battalion was in the reserve Brigade of the 41st Division and advanced as planned after the capture of the German front line. The strong points of Oblong Trench, Englebrier Farm, Ravine, and Denys Wood were rapidly captured, and by 9 am the 15th Battalion had consolidated on its final objective. 2nd Lieutenant Whaley and Regimental Sergeant Major Greenwood were both awarded Military Crosses for capturing large numbers of prisoners (Greenwood with just one man in support captured 20, whilst Whaley braved artillery fire to pursue fleeing Germans).
The Germans began to counterattack; but their plans had relied on the ridge being held until the two Engrief (counter-attack) divisions arrived and their efforts were blunted by British troops who were ready and waiting to meet them. The 15th Battalion repulsed a first attack by 500 Germans at 10 am and had just defeated a second effort at 3 pm when the 24th Division swept through to capture the final Oosttaverne line.
Success had been complete and all objectives across the line had been taken. Estimates vary, but both sides suffered more than 20,000 casualties, with only a little difference between the losses of the attackers and defenders – a rare achievement during the First World War.
The 15th Battalion suffered 43 killed or missing and 141 wounded during the capture of Messines Ridge.
A notebook belonging to Whaley’s commander in the museum’s collection contains the original recommendation for 2nd Lieutenant Whaley’s Military Cross.
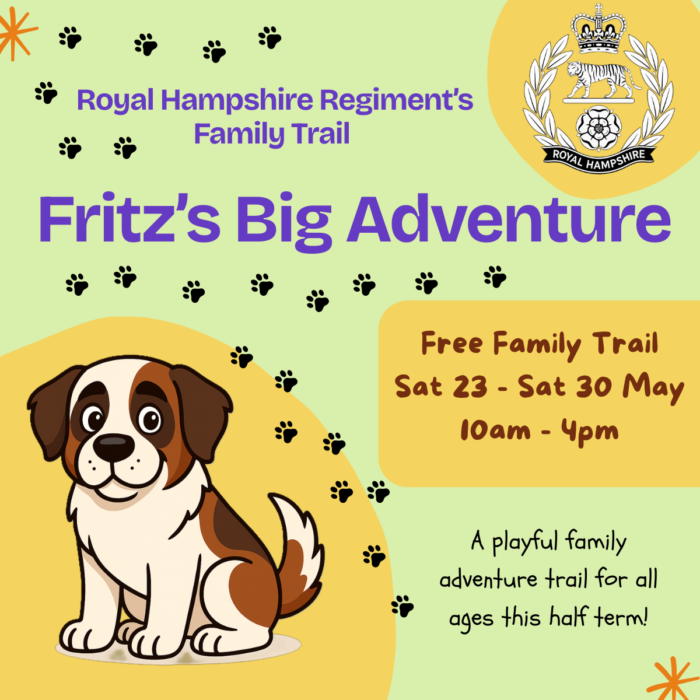 Join the Royal Hampshire Regiment Museum and Fritz the Dog for a FREE hands-on family trail around the museum this half-term.
Follow the story of the Royal Hampshire Regiment’s much‑loved four-legged mascot on a self‑led discovery trail around the museum.
With six imaginative stops and playful challenges inspired by Fritz’s real-life adventures, this trail is perfect for curious kids and grown‑ups who love a story.
Fritz’s Big Adventure is available for free during May half-term – Saturday 23rd May – Saturday 30th May 2026, 10am -4pm.
Entrance to the museum and participation in the trail are FREE but donations towards the upkeep of our historic collection are welcome.
The museum is located on Southgate Street, Winchester, a short walk from the High Street.
The Easter Duck Adventure Trail26 March – 13 April | Royal Hampshire Regimental Museum
Something very silly has happened at the museum…
Our newest museum helpers, the Duck Recruits, have wandered off on an adventure! Now they’re hiding throughout the galleries and in the Memorial Garden, and they need your help to complete their Easter training.
Join us this Easter for a fun, family-friendly trail perfect for all ages.
Search for six Duck Recruits, each exploring a different part of the museum; from colourful uniforms and shining medals to the quarter-scale Jeep and the peaceful Memorial Garden.
Collect a letter from each duck, crack the final password, and return to the Welcome Desk to receive your reward.
Are you ready, Recruit?
Trail Highlights
Plus…
Quack & Create Station
Stay a little longer at our creative activity table, where young visitors can:
Whether you’re helping the ducks with their training or crafting your own masterpiece, it’s a perfect day out this Easter.
Front of House Volunteers Needed – Tuesdays & Wednesdays
We are looking for Front of House Volunteers to greet all our visitors, provide them with an introduction to our history and some information on the building, and then to assist with any further inquiries they may have.
You may also be selling items from the museum shop with cash or card.
Training is provided, and there is the chance to work on other museum projects if interested.
You do not need to have any previous experience, just a confident manner, interest in history and telling the stories of our fabulous collection.
If you are able to help out for a few hours a week, and are interested to know more, please get in touch with the curator at
museum@royalhampshireregiment.org

